Make HTTPS requests in Android, Kotlin with Retrofit [AK 9 HTTPS]


This tutorial details how to make HTTPS GET requests, in Kotlin, with Retrofit: a networking library for Android.
In this way, a mobile client is build to communicate with a third party.
Namely, the aim is to get countries from the backend, REST Countries APIs, to illustrate HTTPS GET requests.
Note: Retrofit version 2.9 is used (latest version to date).
Following, the steps of implementation:
- Configure the AS project to use networking libraries
- Analyze the expected results
- Create the models
- Create the API interface
- Make requests
Configure the AS project to use networking libraries
First of all, it’s about adding the internet permission in aim of authorizing the application to connect to the internet.
In addition, networking libraries are added to the Android Studio project, in dependencies section:
- Retrofit to create a client and make HTTPS requests
- Moshi to convert into Kotlin objects the JSON results received from server
- OkHttp to deal with backward compatibility
- Create a new Android project, let’s name it WonderfulWorld, with Empty Activity as project template.
-
Add the internet permission, in the
AndroidManifest.xmlfile, between<manifest>and<application/>tags:<uses-permission android:name="android.permission.INTERNET" /> -
In the Gradle Script file attached to the
appmodule, include these 3 libraries:dependencies { implementation "com.squareup.retrofit2:retrofit:$retrofit_version" implementation "com.squareup.retrofit2:converter-moshi:$moshi_version" } -
In the Gradle Script file attached to the whole project, add the version variables:
 ext.retrofit_version = '2.9.0'
 ext.moshi_version = '2.9.0'
Analyze the expected results
The aim is to find, test HTTPS requests and then dissect the results with Postman.
-
Let us begin with this simple HTTPS request:
https://restcountries.com/v3.1/all -
Following is an extract of the results from Postman:
 [
 {
     "name": {
         "common": "Barbados",
         "official": "Barbados",
         "nativeName": {
             "eng": {
                 "official": "Barbados",
                 "common": "Barbados"
             }
         }
     },
     "tld": [
         ".bb"
     ],
     "cca2": "BB",
     "ccn3": "052",
     "cca3": "BRB",
     "cioc": "BAR",
     "independent": true,
     "status": "officially-assigned",
     "unMember": true,
     "currencies": {
         "BBD": {
             "name": "Barbadian dollar",
             "symbol": "$"
         }
     },
     "idd": {
         "root": "+1",
         "suffixes": [
             "246"
         ]
     },
     "capital": [
         "Bridgetown"
     ],
     "altSpellings": [
         "BB"
     ],
     "region": "Americas",
     "subregion": "Caribbean",
     "languages": {
         "eng": "English"
     },
     "translations": {
         "ara": {
             "official": "باربادوس",
             "common": "باربادوس"
         },
         "bre": {
             "official": "Barbados",
             "common": "Barbados"
         },
         "ces": {
Create the models
The aim is to create the Kotlin data classes representing the remote data.
In particular, it’s about create a data class representing a country, from the REST Countries APIs. For instance, the WonderfulWord App show:
- name of the country
- capital
- langages name
Moshi library convert the JSON response into objects. Firstly Country has a name, a capital and a list of language. Secondly, Language has a name.
Indeed, the JSON response contains a list (indicated with []) of language objects (indicated with {}).
-
Create the
CountryandNamedata class:data class Country(val name: CountryDetail) data class CountryDetail(common: String)
Note: attributes name are important and have to be exactly like in response from server.
Create the API interface
-
Create the
CountriesServiceinterface:interface CountriesService { @GET("/v3.1/all") fun listCountries(): Call<List<Country>> }
Note: Be careful with imports:
import retrofit2.Call
import retrofit2.http.GET
Make requests
The aim is to create Retrofit client to make requests.
-
Add the API endpoint as static variable in the
MainActivity:companion object { const val URL_COUNTRY_API = "https://restcountries.com/" } -
Instantiate a Retrofit client in
MainActivity:val retro = Retrofit.Builder() .baseUrl(URL_COUNTRY_API) .addConverterFactory(MoshiConverterFactory.create()) .build() -
Create the service variable:
val service = retro.create(CountriesService::class.java) -
Create the request variable:
val countryRequest = service.listCountries() -
Create the request, then send it async:
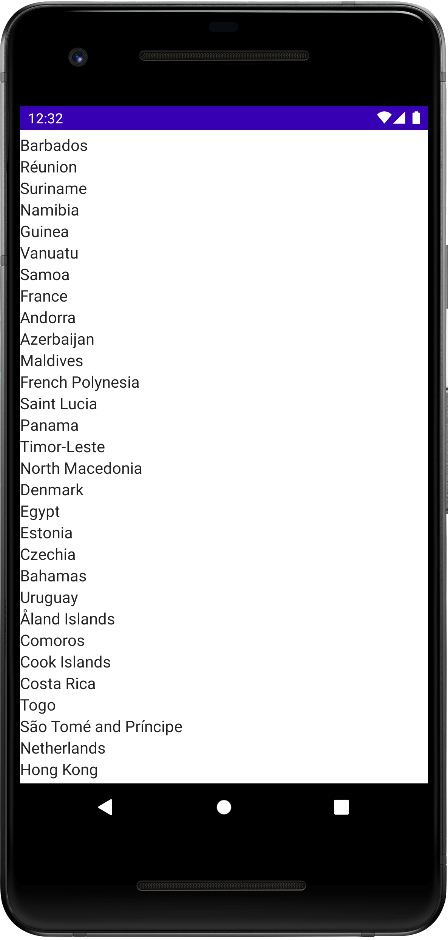
 countryRequest.enqueue(object : Callback<List<Country>> {
         override fun onResponse(call: Call<List<Country>>, response: Response<List<Country>>) {
             val allCountry = response.body()
             for (c in allCountry!!)
                 Log.v(
                     MainActivity::class.simpleName,
                     "NAME: ${c.name.common} \n "
                 )
         }


         override fun onFailure(call: Call<List<Country>>, t: Throwable) {
             Log.i(MainActivity::class.simpleName, "RETRY AND GOOD LUCK.")
         }

     })
The response is in the
allCountryvariable. If not, make sure you have access to the internet on your smartphone (or your laptop if you’re using an emulator).
You can get the code via the “Kotlin for Android: quizzes” app. in the “HTTPS Communication” topic.
References
Found a typo or want to improve this post? Edit it directly!